How to Sew a School Kilt
Does your school have uniforms? Are they overpriced? Do you hate the administration and want to do everything in your power to spite them? If so, this tutorial is for you. With just a sewing machine, fabric, and hours of painstaking work, you too can deceive your teachers into thinking you actually spent $68 $95 on a damn skirt.
Yes, they seriously raised the price by nearly $30 since I started writing this tutorial. Fabric price is the same though...
What You'll Need
Okay, I lied. You need more than just fabric and a sewing machine to make this. Here is a list:
- Sewing machine
- Scissors
- Iron and ironing board
- Measuring tape
- Fabric chalk or marker
- About 2.5 metres of fabric (depending on size; see step 1 before buying)
- Matching thread
- 2 matching 1/2" (12.5mm) buttons
- Fusible interfacing (optional but recommended; length needed is the waistband length in step 1)
Having a real version of your school’s kilt on hand would also be helpful for comparison. You could definitely do it without it, but it might not look exactly the same. Your best bet is to find one secondhand or borrow one from a friend. Don’t buy one from the school, though, you can’t let them win.
Choosing Fabric
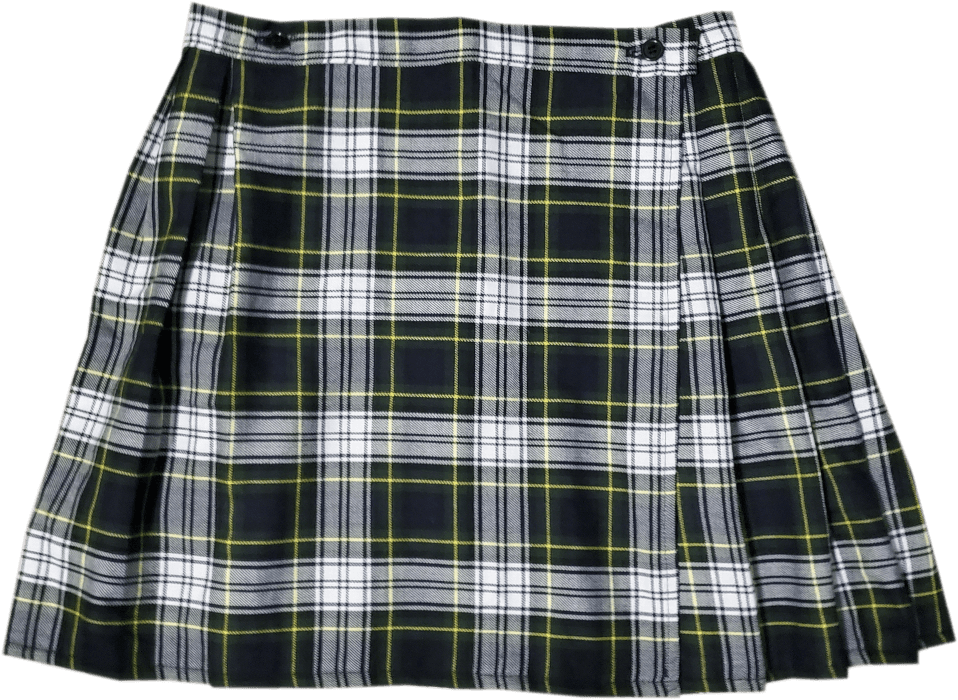
When it comes to plaid, many schools use official tartan patterns for their kilts. If you don’t know what your school uses, try looking up “[insert colours here] tartan” and see what comes up. If you can’t find one even similar to your kilt, it’s probably not a real tartan. If it’s a simple check, you might be able to find a gingham that matches, but if it’s not, you’re probably screwed. You might be able to replicate the plaid on some type of online tartan generator then upload the resulting image to Spoonflower, but I haven’t tested this. Worst case scenario, just get something in similar colours; some girl at my school wore a kilt from a completely different school for like 2 years and no one noticed, so you’ll probably be fine.
Most kilts use fabric made of either wool or polyviscose (combination of polyester and viscose/rayon). That doesn’t matter too much, though, as long as the fabric looks like the real thing. It will most likely have to be yarn dyed fabric (where the thread is dyed before weaving), which is why I doubt Spoonflower would work right: the patterns are printed on after.
Instructions
Step 1: Measuring
You’re going to measure the following things:
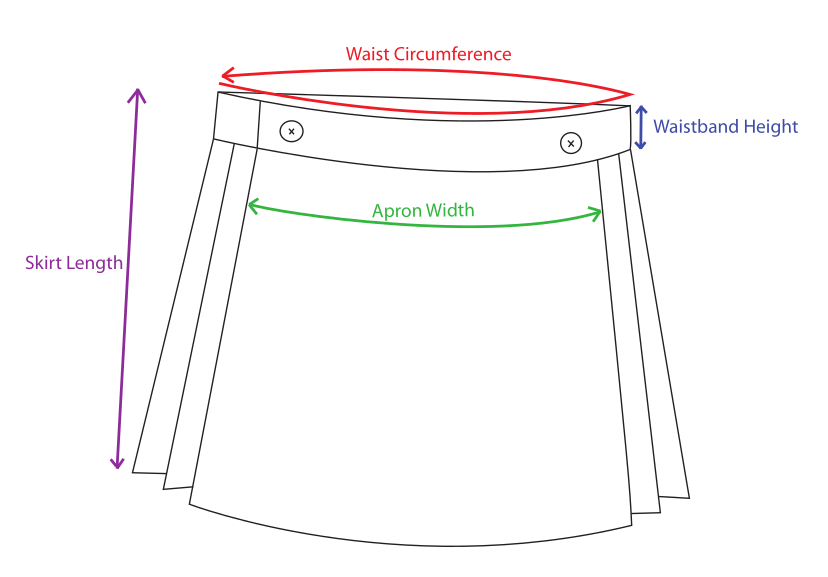
Waist Circumference – Measure around your waist at the height you want your kilt to sit.
Waistband Height – The distance from the top of the waistband to the bottom of the waistband.
Apron Width – The width of the non-pleated part at the front.
Skirt Length – How long you want your kilt to be (measured from the height you measured your waist circumference at)
Seam Allowance – Whatever you want, but I recommend 0.5 inches. This shit frays like crazy.
Now time to do math! Just kidding, it’s so stupidly complicated that I figured it out for you and all you have to do is plug your measurements into this handy dandy Javascript tool thing:
Waistband Width: |
You now have the dimensions for the two rectangles you're going to cut from your fabric: one for the waistband and one for the main skirt piece. Then you just need to figure out how to arrange it on the fabric so you can buy the least amount possible. It will have to be at least as long as your skirt width. I think it’s worth noting now that you will probably be able to make at least two kilts out of the fabric. I was able to make three, though I ended up having to use the selvage in the last one which is not good practice. Here's how I arranged mine:
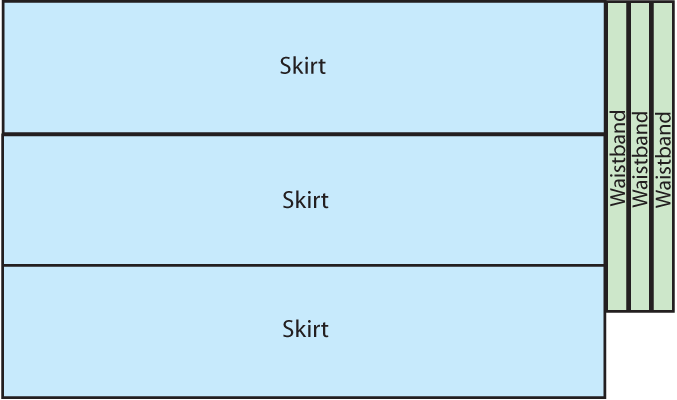
Now you just need to buy your fabric.
Step 2: Cutting the Fabric
Once you have your fabric, you’re going to cut out your skirt pieces. Find somewhere to spread out the fabric, probably the floor. Most yarn-dyed fabric like plaids are relatively loose-woven, so make sure to avoid stretching it along the bias and follow the existing lines in the plaid while cutting to ensure your pieces are straight. Following whatever arrangement you figured out earlier, measure out your fabric, mark it with the fabric chalk, and cut it. Repeat with the waistband piece on the interfacing.
Step 3: Hem the Skirt
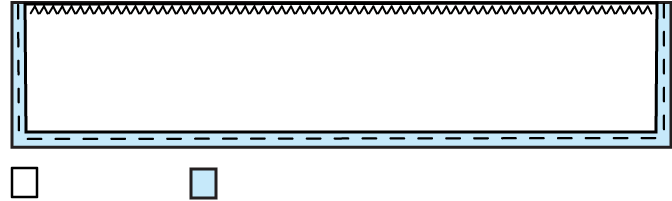
Next you’re going to hem the skirt piece. Because the fabric frays so much, you’re going to fold the seams over twice when you hem them so the rough edges are enclosed. Place your fabric right side down on your ironing board. On the bottom edge, measure out your seam allowance, fold it up along that line, and iron it. Fold it over again the same amount, iron it, pin it, and sew. Repeat on the side seams. This stitching will be visible, so make sure it’s straight and that you sew the same distance from the edge of the fabric each time. It's up to you how far from the edge you sew, but it's best if you keep your stitching as close to the top folded edge of the hem as possible.
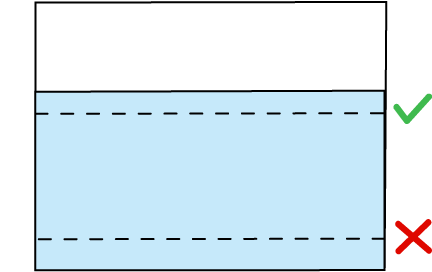
The top edge of the skirt piece does not need to be hemmed because it will be enclosed in the waistband, but you might want to zigzag stitch along the edge to stop it from fraying.
Step 4: Putting in Pleats
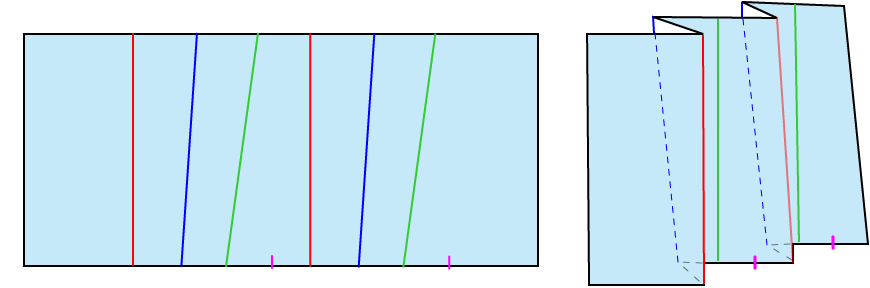
The first step to putting in pleats is to take your apron width and measure that distance from the right edge of the fabric. Mark a line at that distance with fabric chalk. Repeat this from the left side as well. You are not going to put in any pleats in these sections.
Next, you need to figure out how big to make your pleats. With my school's kilts, I found that the pleats were about 1" wide at the top and 1.5" wide at the bottom. This size difference makes the kilt look more gathered in the waist, as at the top the pleats are deeper to accommodate the fabric. However, this can make it more difficult to fold the pleats, especially when working with pleats of a different size (there's a bunch of math that goes into figuring this out so you can't just choose any numbers). If your kilt will have approximately the same size pleats as mine, you can follow along with the 'gathered' pleats tutorial, otherwise I would just do normal pleats.
Normal Pleats
To make normal pleats, take your pleat width and, starting at the left apron line, measure and mark this distance. Then measure from that point another pleat width distance. Continue doing this until you reach the right line. You will probably want to mark these measurements along both the top and bottom of the skirt piece to make folding easier. There will be a gap approximately 1.25 cm or 0.5" between your last measurement and the right apron line; this is fine.
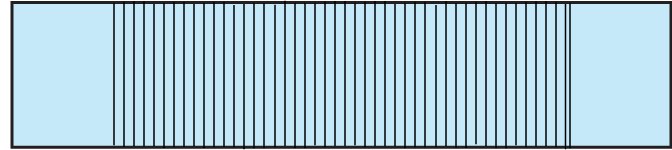
Next, place your fabric on the ironing board right side up. Pinch the fabric along the left apron line and fold it along the next measurement line so that it meets the line after. Press and pin, making sure you pin parallel to the fold to prevent it from slipping. Skip to the next line after that and repeat the process across.
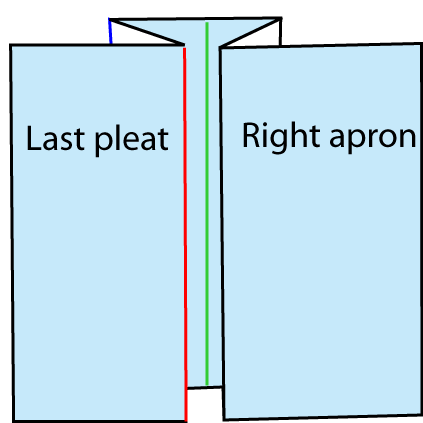
Once you've folded all of your pleats, you will still have the aforementioned gap between the last pleat and the apron. The purpose of this is to allow you to nicely finish the end of the pleats on the front of the kilt. Pinch the fabric along the apron line and fold it until it meets the last pleat, press, and pin.
You are now finished folding your pleats, and with the amount of pins it took you probably have something that resembles a cactus more than a kilt. Take your skirt piece to the sewing machine and sew the pleats in place within the seam allowance. If you have a walking foot, now is a good time to use it, otherwise just make sure the pleats don't shift or get folded over while sewing. If you're really struggling with it, try pinning some tissue paper over top to make it a flat surface.
Gathered Pleats
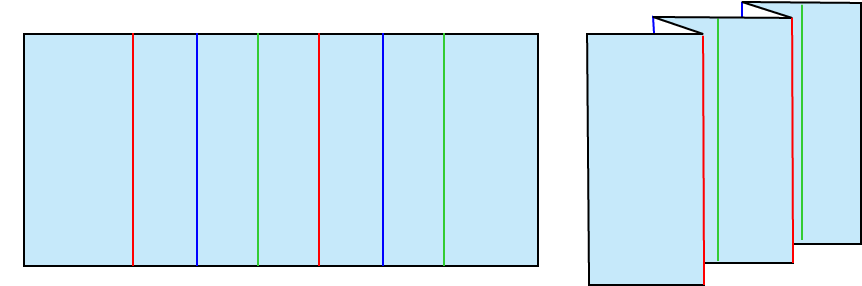
For a more gathered look, follow the measuring pattern outlined in the 'normal pleats' tutorial only along the top edge with a pleat width of 1", then measure out every 0.75" along the bottom edge. Fold the top the same as the normal pleats, but for the bottom, fold your left apron line (red) to the second measurement (green), then skip one measurement (pink) and start your next pleat at the following measurement (red). This will result in pleats that are half as deep at the bottom as at the top.
Follow the rest of the normal pleats tutorial as described.
Step 5: The Waistband
The first step in attaching the waistband is to apply interfacing. There are two benefits to doing this: firstly, it stops your waistband from looking floppy, and secondly, it ensures your waistband does not stretch along the bias while sewing, resulting in crisp lines. Lay your fabric right side down on your ironing board, ensuring that it is straight (meaning the plaid lines are at right angles and not bent). I have an ironing board cover with stripes on it which makes this very easy and I'd highly recommend it if you do a lot of sewing. Then apply your interfacing according to manufacturer's directions (usually the side with the dots goes down and you press with medium heat).
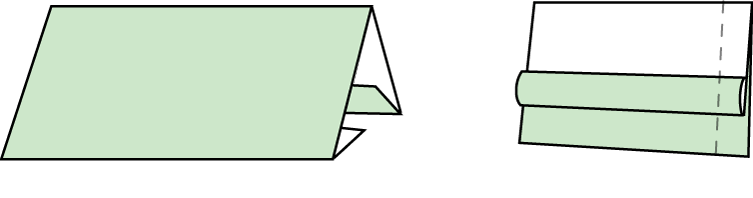
Next, fold your waistband piece in half along its length so that the interfacing is on the inside and press. Then fold and press in your seam allowance, again so that the interfacing is inside. You should now have a long strip with no exposed edges anywhere but the two ends. To close these ends, turn the centre fold inside out, unfold one of the seam allowances, and sew along the edge seam allowance, stopping at the seam allowance folds. Be sure to reverse stitch on these seams because they have a tendency to come apart. Trim the seam allowances, especially the corners and the one seam allowance left unfolded.
Turn the waistband right side out, then pin the unfolded waistband seam allowance to the top of the skirt piece right sides together, starting on the right side (as opposed to the left). This way, if the waistband is longer than the skirt, the excess will be hidden. If it happens to be smaller than the skirt, feel free to move the seam of the waistband over a bit and try again. Then, sew just slightly inside the seam allowance.
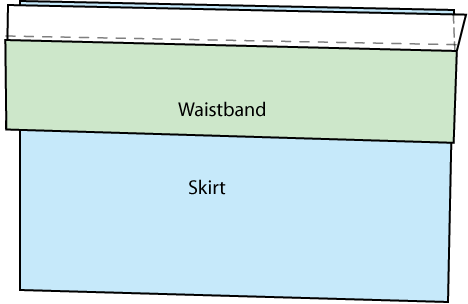
Fold the waistband up and over the top of the skirt piece. It should look almost like a completed waistband now. Pin this in place, ensuring the prevous stitching is covered by the waistband and the seam allowances are tucked inside. Finally, sew the waistband close to the edge to secure it.
Step 6: Buttons
The last step is to sew buttons and buttonholes onto the waistband so the kilt can be worn. On the right side, measure and mark a vertical line around 1 cm (3/8") in from either side of the apron; these mark the outside edges of the buttonholes. If your machine can do 1 step automatic buttonholes, then you're all set (presumably, I have no idea how that works). If you're like most of us and have a normal machine, then mark a horizontal line 1.6 cm (5/8") long starting at the last marking centred vertically on the waistband. Then, draw another vertical line to mark the end of the buttonhole. Sew the buttonhole using your markings as a guide, and cut open (a utility knife works really well for this).
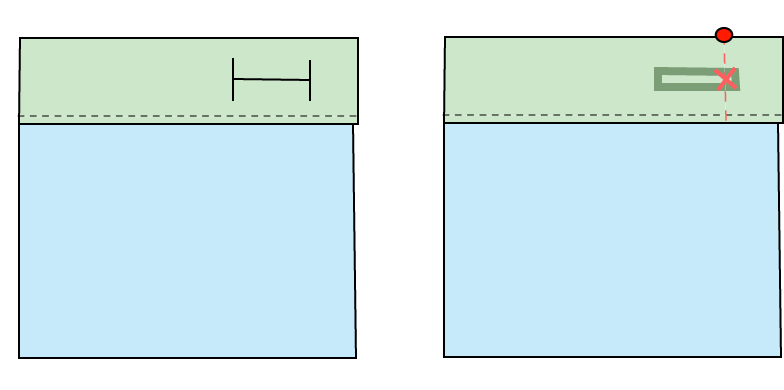
To determine where to sew your buttons, wrap the kilt around yourself with the right side on top and determine how tight it needs to fit. While holding it in this position (or having pinned it there), place a pin vertically through the bottom waistband layer just slightly to the right of the left side of the buttonhole (this is described from your point of view; in the diagram it is slightly to the left of the right side of the buttonhole). Remove the kilt and use the position of the pins to determine where to sew the buttons, ensuring they are centred vertically.
Step 7: Enjoy your Kilt
Wear your kilt and bask in the glory of having made something cool, saved money, and tricked everyone in your school into thinking you're following the rules when you actually aren't. Hopefully you're not like me and finally finish them during my second year of university...
These also sell really well, especially if your school stopped selling real kilts and replaced them with very ugly, very uncomfortable skorts for the same price. I made three kilts, sold them within a week, and made a profit of $45. I charged $30 each but with the raise in prices I could have gotten away with $45 each and made $90 profit. They weren't even the right size for the people buying them, but the demand is so high they didn't care and said they would just move the buttons. If you like sewing this could be a fun little summer side hustle. Buy yourself a blind hem foot and learn to hem pants and you have yourself a business.